Chelsi Nakano
May 02, 2016
Every day, we help people within organizations create amazing presentations—and the process most often starts with their PowerPoint decks. Instead of having to recreate all of their existing assets in a new platform, many people want to repurpose their old slides into more dynamic and visual presentations. Our PowerPoint import tool makes it easy for you to bring all of your existing content into Prezi—but once you’ve imported all of your content, how can you translate it into something far more impactful than a collection of slides?
When you make the transition from slide-based presentations to Prezi, you are going to have to think differently about your content and how you are guiding the audience through your story—otherwise, you’ll end up using Prezi simply to host your PowerPoint deck, which isn’t much of an improvement on what you already have. If you want to take full advantage of Prezi, you are going to need to break away from the standard linear progression of content and think about meaningful structure.
If all this is starting to sound complicated—don’t worry. We have developed a four step process for converting your old slides into a powerful prezi. In 20 minutes or less, you’ll be able to repurpose your existing assets into something amazing. Here’s how:
1. Import your slide deck.
Don’t start with a pre-made Prezi template, but instead begin with a blank canvas. You will be able to add a templated structure to your presentation later, once you’ve organized your content.
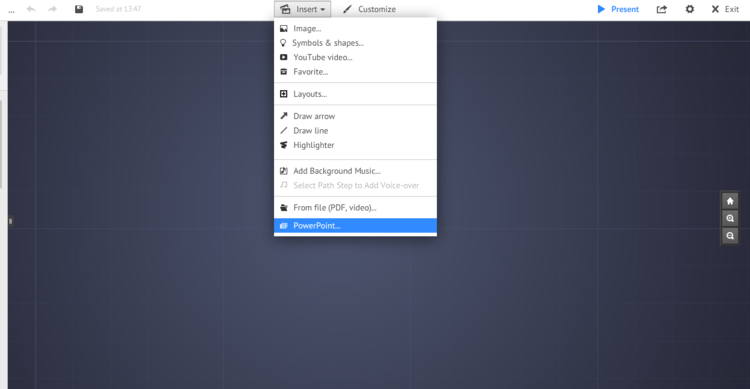
Once you have your blank canvas, the first step is to import your PowerPoint deck. Click “Insert,” and select “PowerPoint.” Locate your file, and begin the upload. Prezi is converting each of your slides into a vector-based PDF image. The process only takes a few minutes.
Once all of your slides are visible in the sidebar, simply drag and drop them onto the canvas. Now, you should have a collection of images that you can move around, resize, and play with.
2. Organize your slides on the canvas.
Once you have all of your slides on the canvas, it’s time to organize them into categories. Place slides that go together next to each other, so that you can see your presentation broken down into distinct parts. See our example below:
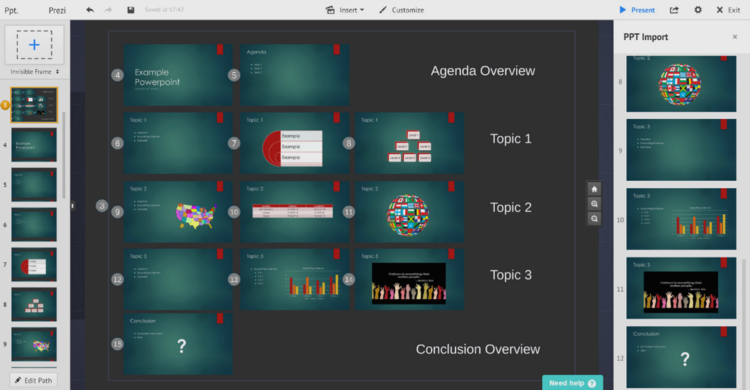
Keep in mind that this step is simply so that you can see how the various pieces of content in your presentation relate to one another. Don’t worry about getting the alignment or spacing perfect, as we will be rearranging these content topics into a meaningful structure in the next step.
3. Choose a meaningful structure for your content.
Now that you have a sense of how many topic-based sections your presentation has, it’s time to think about structuring all that content. You might be thinking, “I don’t even know where to begin!” Well, luckily, Prezi has a ton of pre-made “layouts,” which you might think of as structure templates, that you can choose from when building your presentation.
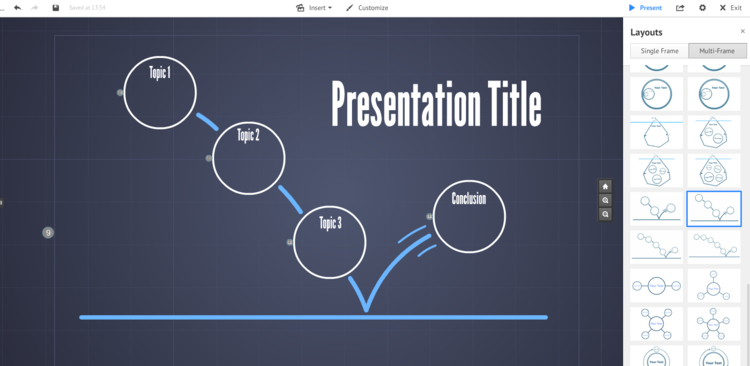
To see all of the pre-made layouts available, click “Insert,” and then select “Layouts” and switch over to the “Multi-Frame” view. Here, you’ll find a number of structures that will help you arrange your content in a way that adds meaning to your presentation.
Select the structure that will work best with your content, and drag it onto the canvas. You’ll want to make sure that the structure you choose has the same number of frames as you have content topic areas, and you will also want to make sure that the flow of your presentation matches the layout of the structure. Here’s our example:
Once you get the hang of structures like these, you can start making your own—but for now, let’s start with a pre-made one.
4. Merge your slides with the structure.
Now that you have your structure and your slides together on the same canvas, you need to start bringing the content from those slides into the frames of your structure. You could do this by dragging your entire slides into position in the frames where they belong, with their “like” counterparts. If you want your end result to look a little bit more polished, however, you can also pull out the key pieces of content from each slide and combine those images, graphs, and tables with graphics from Prezi’s library.
To pull those key pieces of content out of your existing slides, simply use Prezi’s “crop” feature. Just click on the slide and select “Crop Image.” By doing this, you can cut out any of the extraneous text or background color that could distract from your key content. If there are multiple pieces of content that you want to pull out of a single slide, you can duplicate that slide and crop each one around the pieces you want to save.
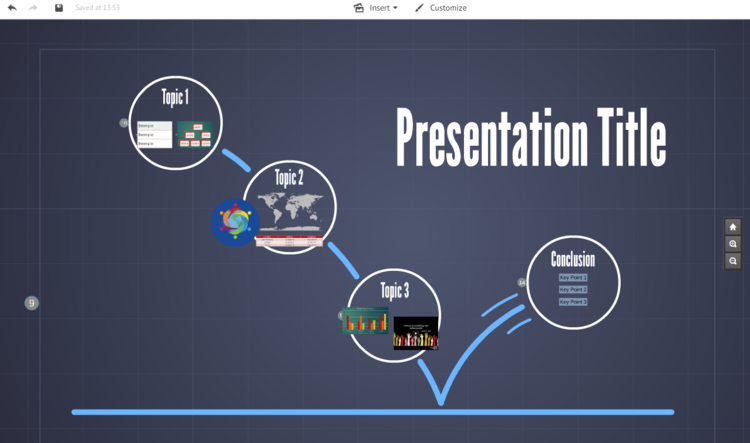
Once you have gotten all of your key content from each slide and arranged it within the layout that you selected in the previous step, your presentation should look something like this:
The last and final step is to click through your presentation and make sure that your path is correct. With your pre-made layout, each of the main frames will already be in the path; however, if you want to zoom in on any particular piece of content, you will need to add that to the path.
So there you have it—you’ve successfully converted your PowerPoint into a prezi! There are still a number of cosmetic things that you can do to make your presentation look a little bit more on-brand and visually dynamic. Consider adding a presentation title to your canvas, fade-in animation for some of your more content-heavy frames, and additional graphics (or even a background image). If you have a branded theme for your company, now would be the time to apply that to your prezi.
There you have it—four steps and 20 minutes from PowerPoint to Prezi.

